A common Databricks task is to schedule a job that calls a notebook. However, sometimes you will want to do this in reverse. In other words, you want to run a notebook that launches a job.
This is most likely when you have set up a job that you want to test without creating a new task. It’s also handy when you are testing how a job performs repeatedly i.e. you want to run it multiple times in a loop.
There are two ways to do this. Both methods use the REST API that Databricks provides to interact with jobs. This article walks through each method with examples.
Table of Contents
What You Need In Advance
Regardless of the method that you choose, you will need:
- the job ID
- your Databricks instance name
- an access token
How To Find The Job ID
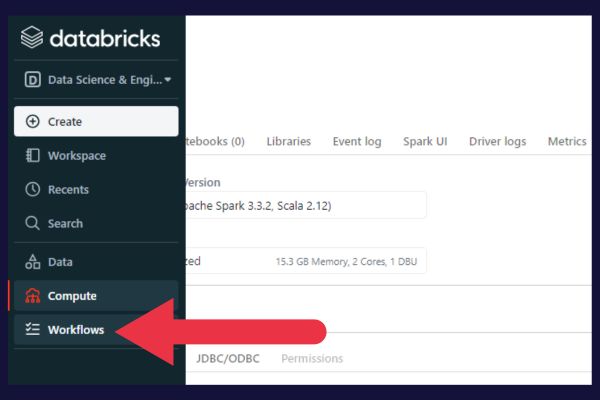
You will need the unique Job ID that is assigned when a job is created within Databricks. To get the ID, follow these steps in the web interface:
- Click on Workflows in the sidebar.
- Choose the job that you want to call from your notebook.
- Find the ID at the end of the URL in the browser.
Let’s say that the browser shows:
https://acme.cloud.databricks.com/#job/987654
Your job ID is 987654 i.e. the digits at the end of the URL.
How To Find Your Databricks Instance Name
You can find the instance name in the same way that you got the job ID. The database instance is part of the URL displayed in the job details page.
In the example I presented for the job ID above, “acme.cloud.databricks.com” is the Databricks instance.
How To Set Up An Access Token
Because your notebook will be accessing the Databricks REST API, the code will need to authenticate that it has the appropriate access.
You can provide this by creating a personal access token to use in the code.
One alternative to the method I present here is to hard-code a username and password. But this is not best practice.
To set up a personal access token, follow the steps below. Note that you can’t do this in the Community Edition.
- Click on the settings gear cog at the bottom left of the web interface.
- Choose “Admin Settings”.
- Choose “User Settings” from the drop-down menu to open that settings page.
- Click the “generate token” button.
Method 1: Call A Job Via Python Code In The Notebook
This section provides you with sample code. As well as placing your job ID into the relevant position, you will also need to know your Databricks instance. I shows you how to get both in the previous section.
The following code does the following:
- imports the requests library to access the Databricks REST API.
- creates a JSON structure with the job ID that you identified earlier.
- creates a JSON structure with the access token you created earlier.
- uses the requests library to make the API call to run the job.
import requests.json

job_json = {"job_id": <place-your-job-id-here>}

auth_json = {"Authorization": "Bearer: <place-your-access-token-here>"}

response = requests.post("https://<your-databricks-instance>/api/2.0/jobs/runnow", json=job_json, headers=auth_json).json()
If the API call is a success, the response variable (last line) will contain the run ID of the triggered job.
If there is an error, it will be returned as a text message in the response variable.
Note that an error from calling the job does not raise an exception in your Python code. This makes it a little tricky to debug the notebook. You will need to check the message explicitly.
Method 2: Use A Databricks Magic Command To Call A Job From A Notebook
With this method, you shell out to the command line from within the notebook to make the Databricks API call.
Use %sh as the magic command at the top of the notebook cell that is calling the job. (Check out our introduction to Databricks notebooks if this is unfamiliar).
Before I give you the statement to use, make sure you have these detail (I show you how to get them in an earlier section):
- access token
- Databricks instance
- job ID
This is the statement to enter into the notebook cell (with the %sh command):
curl --netrc --request POST --header "Authorization: Bearer <your-access-token>" https://<your-databricks-instance-name>/api/2.0/jobs/run-now --data '{"job_id": <your-job-id>}'Tips For Running Jobs From Notebooks
Your workspace is limited to one thousand concurrent runs. If you are using techniques to run Databricks notebooks in parallel and they are each launching jobs, be careful that you don’t exceed this limit.
Regardless of what you are using a notebook for, each individual cell can output a maximum of 8 MB. There is another upper limit whereby all the cells in the notebook have a total limit of 20 MB.
If these limits are hit, then the running job will be cancelled and marked as failed. To avoid problems with these limitations, you should attach your notebook to an all-purpose cluster.