This article is about how to create a Facebook business page without connecting it to your regular personal account.
We assume you have a regular Facebook personal account that you use to connect with friends and family.
You want to create a Facebook business page but you’d prefer that it is completely separated from your regular personal account. Read on to learn how to achieve this using a workaround.
Table of Contents
Why You Have To Create A Business Page From A Personal Account
We will show you how to keep your business page separate from your regular personal account.
That doesn’t mean you don’t need a personal account to create a Business page. Facebook doesn’t allow the creation of a Business page from outside a personal account.
However, you don’t have to use your regular personal account.
Instead, you can create a separate personal account that is not connected to your regular account.
Separating Your Facebook Business Account From Your Personal Profile
The key to setting up a separate Facebook personal account is to sign up with a different email address than your regular account.
We have detailed instructions in this article on how to set up a second Facebook profile.
You may think you know how to do this, but we have extra steps on how to make the second profile look less like a spam or dummy account to Facebook. This reduces the risk of losing your account.
It’s important that you’re aware that there are some risks of falling foul of Facebook’s regulations. We’ve got more details on this (and how to avoid it) in the linked article.
Using the new personal profile
Every task we take you through in the rest of this article assumes that you’re logged into the new account.
However, you may get distracted and end up on your regular account. it’s easy to forget which one you’re on.
I suggest that you use two different browsers to keep your activity separate for the two accounts.
For example, use Chrome for one and Firefox for the other. I mention these two, because I find that Facebook is a little temperemantal with newer browsers like Edge.
Create Your Business Page Using The Separate Personal Account
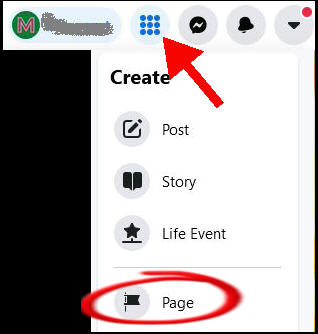
Now that you’ve got your shiny new Personal account, it’s time to create the Business page.
The option is available from a dropdown in the top menu.

If you haven’t done this before, I’ll run through some Facebook quirks.
Naming your Business page
If you’re setting up the page to support a website, you may not be able to format the name exactly how you want.
Facebook only allows a single capital letter at the start of the word.
Let’s say your website is multiple words and you tend to refer to it as MyNicheSite.com. Well, you can’t have a Facebook page named as MyNicheSite. It will have to be Mynichesite.
If you look around, you’ll see all the big companies with multiple words in their moniker have to resort to the same.
Maybe this is why Facebook isn’t “FaceBook” (unlike its rival platform LinkedIn).
Basic info
It’s a good idea to pick a relevant category in the Categories section.
I also add a description to the Business page that basically describes what my website is about.
Contact info and social signals
I usually set up a support email for my business and website. This goes into the “Email address” section.
Then add the business domain to the Website section.
I don’t add any other details like geography. And I certainly don’t enter a phone number!
Privacy settings
Unlike personal accounts, your Business page is open to almost anyone and everything.
However, one thing you can control is whether visitors can post on your page.
Personally, I disable this option straight away. However, you may be looking for user engagement, so do what works for you.
Business page username
Facebook will tease you with a link to create a specific username for the Business page. Annoyingly, they offer the link for a new page, but you can’t actually set it up yet.
Your fresh new page will need to get a little older and acquire a little more activity.
So, ignore this option for now.
One More Social Signal On Your New Personal Account
If you followed along with our article on setting up another Facebook personal profile, then you may have set up some social signals such as links to a website you own.
However, because the article doesn’t assume you’re also setting up a Business page, it doesn’t mention one additional social profile. We’ll do that here.
Now that we’ve got a named Business page, we can do one more thing to hook everything up like most businesses will.
Go back to the new Personal account and go to the Work area of the profile.
Add a new workplace to be the account’s current position. I set this as “Founder at []” and I use the name I put as the Business page.
Facebook will grab the icon for your “company” from what you set on the Business page. It’s all looking nice and legit!
One Step Further
Now that you’ve got a new personal account with a business page, you may want to go one step further.
Are you wishing your original profile page would disappear off the internet? Are there too many dodgy photos with you enjoying the high life?
Well, you could now nuke the original account. After all, you’ve got the shiny new acccount.
Be sure to check out our article on how to deactivate a Facebook profile page while keeping your business page. It’s got tips on the consequences of deactivating a profile page and how to leave your business page intact.