As a website owner, I often want a spreadsheet of all published WordPress posts with their title, URL, and publish date.
This is difficult to achieve with the WordPress dashboard, and I prefer not to use a plugin for the task. This article takes a quick look at the dashboard and plugin options.
Then I’ll go step-by-step through how to export a list of WordPress Posts to a CSV file using the Control Panel provided by your hosting provider.
Table of Contents
Can You Export WordPress Posts Within The Dashboard?
There is a tool within the WordPress dashboard that lets you export posts.
The problem is that it only exports in the XML format. I want to be able to export in a format that can be pulled easily into a spreadsheet.
But if you want to check out what the dashboard provides, follow these steps.
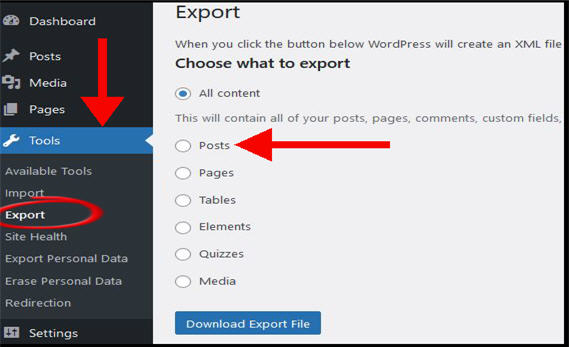
- Run your eye down the left pane of features in the dashboard to find the Tools section.
- Expand the Tools section and click on the Export link
- Choose “Posts” from the list of options
- Click the “Download Export File” button
This picture shows you where the export feature is on the Dashboard page:
If you follow the steps above, you will get an export of posts data. However, the file is in XML format and is difficult to use in a spreadsheet.
I’d like to see WordPress add a CSV option to the export features in future.
Can You Use A Plugin To Export Posts To CSV?
There are several free plugins that export posts that you can download and install on your WordPress site.
Most are made to provide the additional CSV option.
There’s nothing wrong with using a plugin, as long as you choose one that is up to date and doesn’t provide a security risk on your site.
Personally, I tend to avoid plugins. So, I decided to export the list of posts without one. Read on for this method.
How To Export Posts To CSV Without A Plugin
This method involves working within the WordPress database. You can’t do that from within the dashboard.
Instead, you need to access the Control Panel via your hosting provider. Don’t worry if you haven’t done this before. I’ll take you step-by-step through the simple process.
Step 1: find the control panel for your website
How you access the Control Panel will depend on your hosting provider.
When I log into my provider, Host Armada, I look for the Control Panel logo. This logo is the same across all providers.
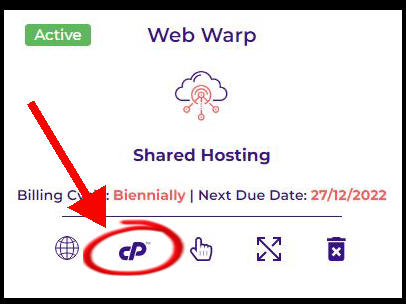
Clicking this icon or logo takes me to the Control Panel dashboard.
Step 2: find the phpMyAdmin icon
Don’t be overwhelmed by the many different features available in the CP dashboard.
Scroll down to the “Databases” section and click the icon labeled phpMyAdmin.
Ignore the other options which actually sound like they might be more relevant.
Remote databases? A database wizard? They may seem more useful than something named “phpMyAdmin”, but the latter is what you want!
Step 3: find the correct database for your website
You are now looking at an interface that lets you search and retrieve data in your WordPress database.
Sure, it looks very outdated. But it does the job.
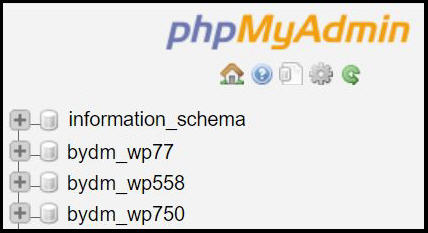
The left pane of the interface has a list of two or more databases. The first database is always named “information_schema”. You can ignore that one.
If you only have one WordPress installation on your hosting provider, then you will just see one more database under “information_schema”. That is the database belonging to your single website.
If you’re like me and have multiple websites on this hosting play, you’ll see as many databases as you have websites.
The challenge here is to identify the database you want to work with. I’ve written a separate tutorial that shows you how to figure out which database belongs to which WordPress website.
Step 4: Expand the database to find the name of your “wp_posts” table
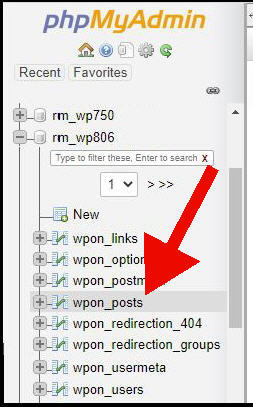
When you click on a database in the left pane, the interface expands to show a list of tables within the database.
One of these tables holds all the data on the posts and pages on your website. This table will be named something like “wp_posts” i.e. with a prefix of “wp_”.
However, it may not be named exactly that. The prefix is often “wp_” but it may be slightly longer.
In my case, the table is named “wpon_posts”.
Step 5: Open the SQL tab
At this point, we move to a different part of the interface on this page.
Click the “SQL” tab in the top menu of the main window.
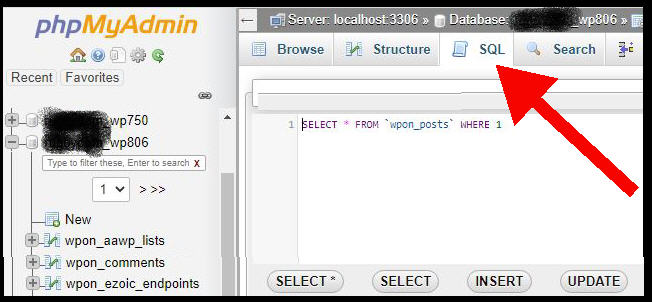
This opens a new box for entering database queries.
Step 6: Copy or type this query into the SQL box
The query I provide below retrieves the post date, URL, and title for all posts on your website.
You may need to change one word in the middle of this statement: the name of the posts table.
SELECT post_date, post_name, post_title FROM wp_posts WHERE post_type = ‘post’ and post_status = ‘publish’
In my case, I have to change it from “wp_posts” to “wpon_posts”. So,my database query is this:
SELECT post_date, post_name, post_title FROM wpon_posts WHERE post_type = ‘post’ and post_status = ‘publish’
Step 6: Press “Go”!
Once you’ve copied or typed in your query, it may not be obvious how to kick it off.
Look for the GO or RUN button which sometimes changes place in this interface. For me, it’s at the bottom right of the box.
Step 7: Change the number of rows
You should now see a lot of rows of data displayed in the main window. Ignore this for the moment.
There is a menu above the data that includes a filter for the “Number of rows”. This is set by default to 25. Unless you change this, you’ll only end up exporting the data for 25 posts.
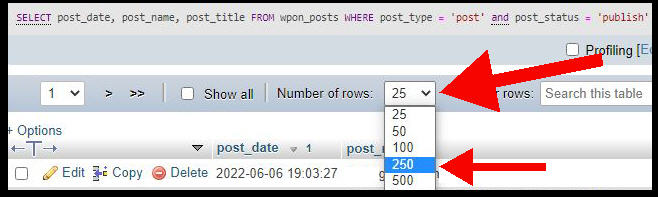
You should toggle it higher to reflect the number of posts on your website. 250 may fit the bill, but set it to 500 if you’ve got a bigger site.
And if you have more than 500 posts, then check the box that says “Show all”.
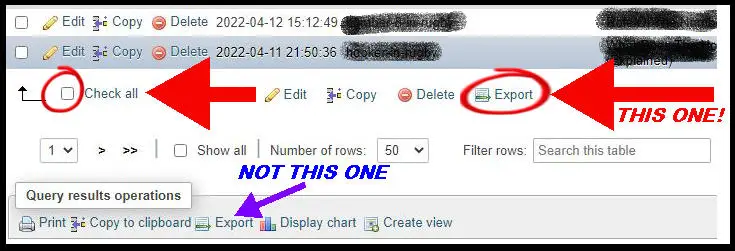
Step 8: Select all rows and click the correct Export button
There are several export buttons in the interface that do different things. That is a ridiculous choice by the interface designers, but I’ll point you to the one to use for our purposes.
There is an Export button at the top and the bottom of the interface. Don’t use either of these!
Instead, scroll down to the last row of data in the main window and look for the Export button immediately beneath it. But don’t click it yet! Take these steps:
- Tick the box underneath the last row labeled “Check all”
- Click the export button underneath the last row
I’ve marked up where to click in the image below.
Step 9: Set the export format to CSV and press GO
The export button opens a settings page.
The most important setting is the format. Expand the format drop-down list and choose “CSV”.
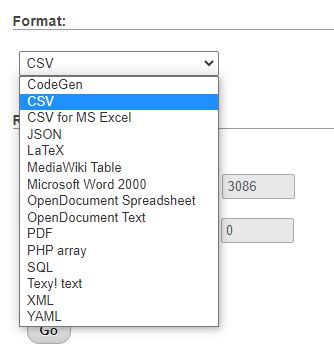
You will also see “CSV for Excel”. Even if you’re using Excel, I advise that you go with the plain old CSV format.
Once you have the right format, press the Go button.
Using The CSV Export File
Your browser exports the CSV file to the downloads file. It will have the same name as the posts table.
Use any spreadsheet application to open the CSV file. They should all format it correctly into columns and rows.