Clusters are a key part of the Databricks platform. You use clusters to run notebooks and perform your data tasks. They are how you harness the distributed computing power of Spark.
This article gives you a clear understanding of what clusters are, how they work, and how to create them. If you’ve just started using the technology, then this beginner guide is for you.
Table of Contents
Why Do You Need Databricks Clusters?
To understand the need for Databricks clusters, let’s look at why companies moved from traditional standalone systems to modern distributed computing.
A traditional single-node system is one where all the processing happens on a single machine or server. This could be your personal laptop or a more powerful server in a data center.
All the tasks including computation, data storage, and data analysis happen in the same place. Let’s say that you’re running a data analysis job. The script would:
- read the data from the machine’s storage.
- process the data using the machine’s CPU (possibly with help from the GPU).
- write the results back to the machine’s storage.
The problem is the volume of data can get too large to fit in the storage or the computing can get too intense for the CPU. The other major drawback is that everything runs sequentially, which limits speed.

This is where a distributed computing system like Apache Spark comes into play. The system divides the computation and data across multiple nodes and processes data in parallel.
The combination of computing, data, and nodes is known as a cluster. The problem with Spark and other systems is that they are complex and time-consuming to configure and manage.
Enter Databricks to the rescue. The company was formed by some of the original Spark founders to package up the power of Spark clusters and provide it to you wrapped in a bow!
For example, Databricks clusters have auto-scaling. In other words, they grow and shrink depending on the data – without you having to worry about fiddling with configuration parameters.
What Is A Databricks Cluster?
A Databricks cluster is a collection of computational resources pooled together to perform big data processing and analytics tasks.
Each Databricks cluster is made up of multiple nodes (virtual machines) that work together to run complex, distributed data processing tasks. These tasks could involve anything from transforming large datasets to training machine learning models.
There are two types of nodes in a Databricks cluster: a driver node and worker nodes.
When you launch code or a job on a cluster, the code first runs on the driver node. This node divides the job into smaller tasks.
The Cluster Manager is a piece of software that allocates and schedules those tasks to run on worker nodes. It also provides or reduces the CPU and resources needed by the nodes for the tasks.
The worker nodes carry out their tasks and send the results back to the driver node. This diagram illustrates it all works:
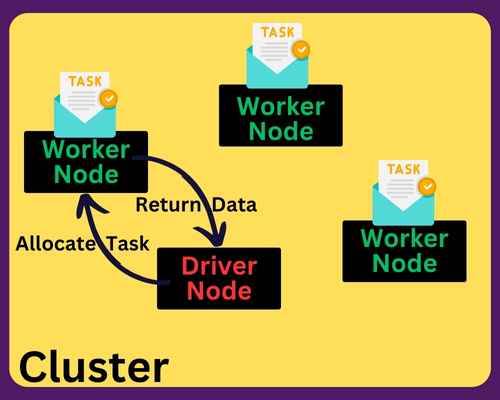
This distribution of tasks allows Databricks to process large volumes of data efficiently and effectively. In addition, Databricks has simplified the process of creating and managing Spark clusters.
Databricks Runtime
Databricks Runtime is basically the backbone of your Databricks clusters. It’s a set of software components and tools that form the execution environment for your data analytics on Databricks.
Runtime gives you a preconfigured Apache Spark with enhancements for performance, reliability, and cloud integration. For example, it has better failure recovery mechanisms than standard Spark.
Runtime also comes with additional libraries and tools to support big data processing and machine learning tasks.
When you run a notebook or a job on Databricks, it executes within the context of a Databricks Runtime environment. It takes care of:
- the execution of your Spark jobs
- managing the underlying resources
- orchestrating the communication between different parts of your Spark applications.
Runtime Versions
Databricks provides different versions of the Databricks Runtime. You pick one based on your needs.
The Standard Runtime is the basic version that includes some common libraries for big data processing such as pandas and NumPy.
If you’re into machine learning, the Runtime ML is specifically designed for your workloads. It includes popular machine learning libraries, such as TensorFlow, PyTorch, and XGBoost.
Runtime Genomics is tailored for genomics applications. You’ll know if you need it and the specialist tool it provides.
“Runtime with GPU Support” gives you extra performance from GPU-accelerated computing.
Relationship Between Databricks Clusters And Apache Spark
Here is a way to think about the relationship between Spark and Databricks.
Apache Spark is a distributed processing engine, and a “Spark job” is a task or computation that runs on the Spark Core (the engine).
A Databricks cluster provides the infrastructure on which Spark operates. Many tasks on Databricks clusters involve running Apache Spark jobs.
When you initiate a Spark job that deals with a large data set, the job is launched on a cluster.
Relationship Between Databricks Clusters And The Data
Understanding the relationship between data and Databricks clusters is key to effectively utilizing the platform.
When a Spark job is submitted, the data associated with the job is divided into partitions. Each partition can be processed independently by a task.
By distributing the tasks across worker nodes, the data can be processed in parallel. This greatly speeds up the computation.
But there’s more to the relationship than this. Databricks integrates smoothly with many data storage systems, such as Snowflake (we have an article on how Snowflake differs from Databricks).
You can read data from and write data to these storage systems directly from your Databricks notebooks or jobs.
Once the data is loaded into a Databricks cluster, it is stored in the memory of the cluster’s nodes for fast access during computation. This key feature of Spark, known as in-memory computation, is one of the reasons for its high performance.
Interactive And Job Clusters
There are two types of Databricks clusters: interactive and job clusters.
Interactive clusters are primarily for exploratory data analysis and collaborative data science. They let you run interactive queries and produce results quickly.
They are designed to run notebooks – web-based interfaces where you run code and visualize your results. Multiple users can attach their notebooks to the same interactive cluster, allowing collaboration in real time.
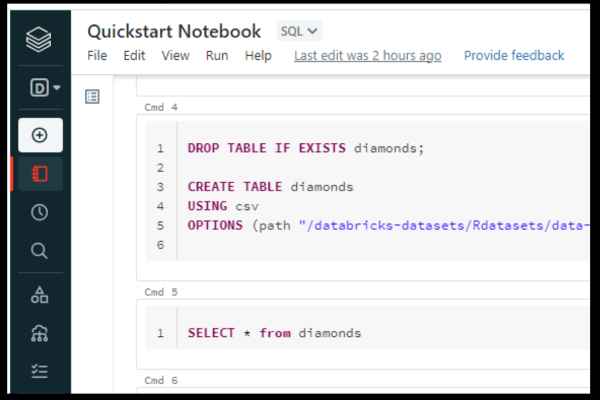
In contrast, job clusters are created automatically when a job is launched and are terminated once the job has finished. They are used primarily for running production jobs and batch-processing tasks.
Because every job in Databricks runs on its own cluster, the jobs are isolated from each other. This reduces the scope for error and conflict. It also avoids a resource-heavy job from slowing down other jobs (if they used shared resources).
Clusters And Auto-Scaling
Auto-scaling is a feature provided by Databricks that automatically adjusts the number of worker nodes in a cluster based on the workload.
By ensuring that the cluster has just the right amount of resources for its tasks, you get more efficient and cost-effective usage.
Auto-scaling is optional in that you enable or disable it. When enabled, Databricks monitors the load on the cluster. If it detects strain under heavy load, it will add more worker nodes…and vice versa.
You can add maximum (and minimum) limits for the number of worker nodes, to keep your costs under control.
If you don’t use auto-scaling, you need to manually add or remove nodes based on your workload.
How To Create A Cluster
Here’s a detailed, step-by-step guide on how to create a cluster in Databricks:
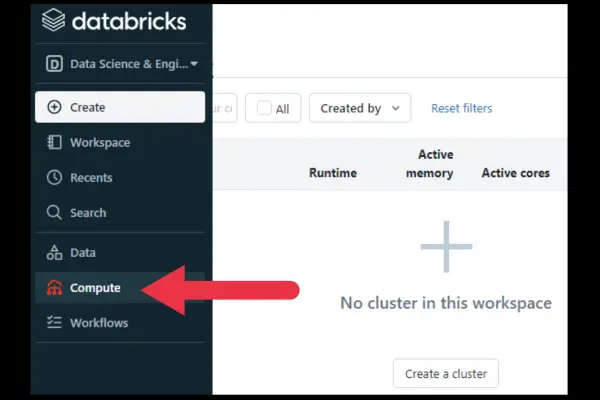
- Click on the Compute link in the left pane.
- Click the “Create a cluster” button.
- Provide a name in the input box.
- Keep the default Runtime or expand the menu to choose another.
These are your options if you are using the Community Edition of Databricks.
Enterprise options
If you have the enterprise version, you will choose between a standard configuration or high-concurrency mode. Choose high concurrency if you plan to share the cluster with many other users.
You also choose whether to auto-scale or not. If you choose auto-scaling, then you can set the minimum and maximum number of workers.
Creating the cluster
When you’re ready to go, click the blue “Create Cluster” button. It won’t be enabled unless you’ve at least named the cluster.
It usually takes a few minutes for the cluster to be ready.
How To Manage Your Cluster
When you click on Compute in the left pane, you’ll see the compute page with a list of available clusters.
You can use the ellipsis drop-down menu at the right of the cluster to restart or terminate it.
When you click on the name of the cluster, you go to its dedicated management page. You can terminate the cluster from here.
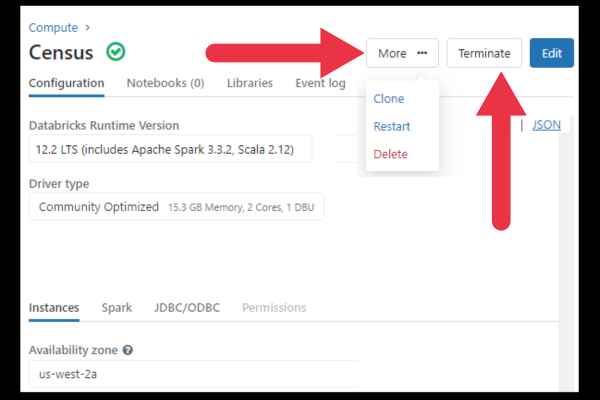
You can also monitor metrics such as CPU and memory usage, disk I/O, and network traffic.
You also have access to logs that capture cluster events, driver logs, and executor logs.