Tables in Snowflake are the primary structure for storing and organizing data within a database. As in other SQL-based systems, a table consists of rows and columns.
You’ve probably worked with tables in other SQL systems, but Snowflake has specific benefits and limitations you need to understand.
This article covers everything you need to know to create tables in Snowflake.
Table of Contents
What You Need To Know About Data Types In Snowflake
The first thing to understand is that Snowflake has fewer native data types than you may be used to from SQL Server or other traditional databases. The most common are:
- VARCHAR
- NUMBER
- FLOAT
- TIMESTAMP
- BOOLEAN
However, there are plenty of other data types that are recognized by the system but are really synonyms for one of the four above. For example, NVARCHAR and INTEGER are recognized but are synonyms for VARCHAR and NUMBER respectively.
This is for syntax compatibility if you are copying DDL from another system. I recommend that you stick with the standard names to avoid confusion.
String Data Types

VARCHAR is the main string data type and it stores Unicode UTF-8 characters.
If you don’t specify a length (e.g. VARCHAR(50)), the maximum length of 16,777,216 bytes is used. However, a string column in Snowflake only consumes the amount of data stored.
You don’t get a performance improvement by specifying a length versus leaving it out.
In other systems, there is a difference between NVARCHAR and VARCHAR where the former version holds Unicode. There is no such difference in Snowflake.
All these string datatypes are synonyms of VARCHAR: STRING, TEXT, NVARCHAR, CHAR, and VARYING.
Numeric Data Types
NUMBER is the main fixed point (non-float) data type. If you don’t provide a precision and scale, it defaults to (38, 0).
The other numeric data types are synonymous with NUMBER. They are allowed for compatibility with other systems.
In other words, these are synonyms of NUMBER: INT, BIGINT, SMALLINT, DECIMAL, NUMERIC.
FLOAT is the main floating-point data type.
These names are synonymous with FLOAT: REAL, DOUBLE, FLOAT4, FLOAT8.

Date and Time Datatypes
The DATE type stores dates without a time element. If you store a timestamp in a DATE column, the time element is removed.
There are three timestamp variations:
- TIMESTAMP_LTZ stores the local time zone.
- TIMESTAMP_NTZ is with no time zone.
- TIMESTAMP_TZ stores a timezone offset (does not take daylight saving into account).
If you just specify TIMEZONE, this is an alias for one of the above – depending on how you’ve set a specific session parameter. The default is TIMESTAMP_NTZ.
What You Need To Know About Constraints In Snowflake
You can add all the ANSI SQL standard constraints that you want, such as UNIQUE, PRIMARY KEY. Or NOT NULL.
Just be aware that only NOT NULL is actually enforced by the system.
In other words, any primary or foreign keys will be accepted and stored as meta-data. But the database won’t reject data based on the keys.
You may be wondering why bother adding them. The main advantage is documentation of what data should be allowed. You may also be using external client tools that can take advantage of the constraints metadata.
3 Types Of Tables In Snowflake

There are three types of tables in Snowflake:
- Permanent
- Transient
- Temporary
This categorization is based on their persistence and availability.
Permanent Tables
These are the default type of tables in Snowflake. The data in permanent tables is persistent, which means that it remains in the table until explicitly deleted or the table is dropped.
They support all Snowflake operations, including:
- cloning
- time-travel (you can query data as it existed at a specific point in time)
- fail-safe (automatic backups)
- data sharing (other sessions and users can access the data)
Transient Tables
Unlike permanent tables, transient tables do not maintain historical data. In other words, they do not support time-travel.
Transient tables also don’t maintain fail-safe for the data once it is deleted.
Their advantage is that they are cheaper and often perform better than permanent tables in scenarios where you don’t need full data durability.
Temporary Tables
Temporary tables are session-specific in Snowflake. They are created within a session and cannot be shared across sessions or users. They automatically dropped at the end of the session.
Temporary tables are automatically dropped at the end of the session, and their data is not preserved.
They are useful for intermediate computations and complex queries where the results do not need to be stored long-term.
Using A Worksheet To Create A Table
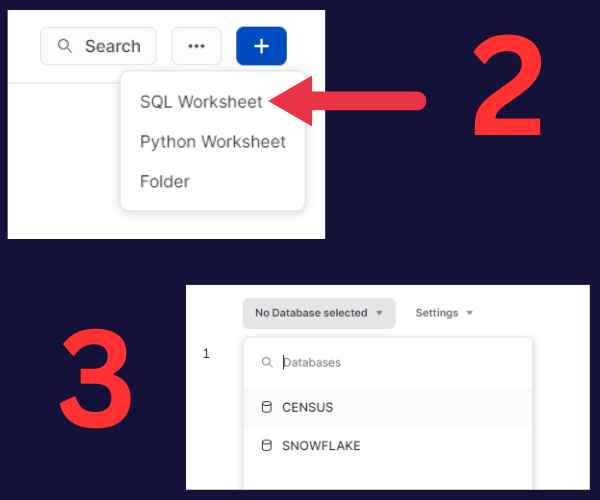
When you log into your Snowflake account, click on the Worksheets tab in the left pane. If you don’t already have a worksheet, then:
- Click the blue “+” button to add one.
- Choose “SQL Worksheet”.
- Select the database where you want to create the table.
- Keep the “Public” schema.
This picture shows the sequence:
The Worksheet interface is divided into several sections. On the left, you will see a sidebar with the schema object explorer.
The center window has the query editor where you’ll write your SQL queries and commands.
Now you’re ready to start writing your table creation statement. Remember to choose the correct database and schema where you want to create your table.
How To Create A Table In Snowflake
The general syntax for the CREATE TABLE statement in Snowflake is:
CREATE TABLE table_name (
    column1 datatype,
    column2 datatype,
    column3 datatype,
   ....
);
For best practice, you should probably include NOT NULL for mandatory columns and specify the primary key.
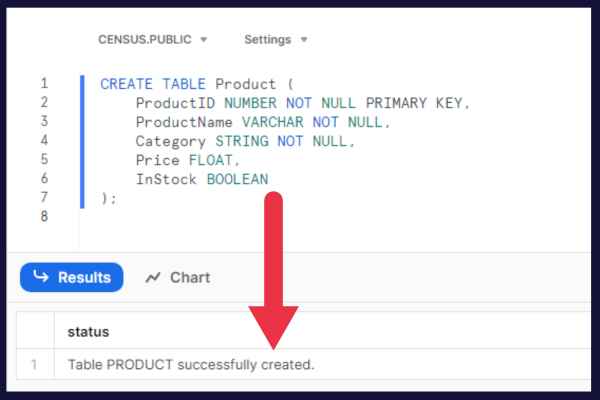
Here’s an example of creating a product table:
CREATE TABLE Product (
    ProductID NUMBER NOT NULL PRIMARY KEY,
    ProductName VARCHAR NOT NULL,
    Category STRING NOT NULL,
    Price FLOAT,
    InStock BOOLEAN
);
After writing the CREATE TABLE statement, the next step is to execute it. Click the Run button (the white-on-blue arrow in the top right of the browser page).
You should see a success statement in the results section below the statement.
Now you can expand the Object Explorer in the left pane to see your new table:
It’s a good idea at this point to rename your Worksheet from the default name (a timestamp) to something helpful like “Create Table Product”.
Time Lag In The Object Explorer
Sometimes a table takes a while to show up in the Object Explorer.
This can be confusing, but if you run the Create Table statement again, Snowflake will tell you that the object already exists.
I find that if I click around into other areas of the Snowsight interface, it will show up in about a minute. Alternatively, you can log out and log back in again.
This is just a visual problem. If you run SQL queries using the table, they will be fine.
Advanced Create Table Clauses
The CREATE TABLE statement in Snowflake is a powerful command with numerous optional clauses to help you customize the table to your specific needs.
The three most common clauses are:
- Clustering
- Data Retention
- Comments
Clustering
The CLUSTER BY clause is used to define a clustering key for the table.
To learn more, check out our separate article on partitioning and clustering tables in Snowflake.
Data Retention
The DATA_RETENTION_TIME_IN_DAYS clause sets the number of days that historical (changed or deleted) data is retained for Time Travel.
If not specified, the retention time is determined by the data retention period defined for the database.
Comments
The COMMENT = clause adds a comment to the table. It’s useful for providing additional information or context about the table.
Example
Here’s an example of using the three clauses:
CREATE TABLE Orders (
    OrderID NUMBER PRIMARY KEY,
    CustomerID NUMBER,
    ProductID NUMBER,
    OrderDate DATE,
    TotalAmount FLOAT
)
CLUSTER BY (OrderDate)
DATA_RETENTION_TIME_IN_DAYS = 90
COMMENT = 'This table stores information about customer orders';
How To Verify Your Table In Snowflake
After creating a table in Snowflake, it’s good practice to verify the table creation to ensure everything is set up correctly.
There are three ways to do so:
- DESCRIBE TABLE [table name]
- SHOW TABLES
- Using the Snowflake web interface
The DESCRIBE TABLE command outputs the column names, data types, and other schema details.
The SHOW TABLES command lists all tables in the current schema.
You can also view all tables using the Snowflake web interface. To do so:
- Click on the “Databases” section in the left pane.
- Select the database and schema.
How To Clone Tables In Snowflake

Cloning in Snowflake means making an exact copy of the object – in our case, a table. The clone copies both the table structure and the data.
The syntax is simple. You just need to remember the order of the original and cloned table! This is the basic command:
CREATE TABLE new_table CLONE original_table;Let’s say you want to clone the Product table we created earlier. You’ll name the new table “Product_clone” (clever, eh?). Here’s how you would do that:
CREATE TABLE Product_clone CLONE Product;Cloning is a quick operation that doesn’t consume much compute resources, regardless of the size of the table being cloned.
This is partly because the clone initially shares its storage with the source table. It only uses additional storage when changes are made to either the clone or the source.
Copying Time Travel History
You can include the Time Travel history by specifying the WITH DATA option.
CREATE TABLE Product_clone CLONE Product WITH DATA;the cloned table will include both the current data and the historical data up to the retention limit.
Cloning Table Structure Only
If you want to clone a table structure but not its data, you should use the CREATE TABLE … AS SELECT command with a WHERE clause that yields no results.
Here’s an easy way to do so:
CREATE TABLE new_table AS SELECT * FROM original_table WHERE 1=0;How To Create Tables From Existing Data
In some scenarios, you may need to create a new table based on the existing data in another table. This is often done when you need a subset of the data or a combination of.
Snowflake provides a way to do this using the CREATE TABLE … AS SELECT command. This is often abbreviated as CTAS. Here is the syntax:
CREATE TABLE new_table AS
SELECT column1, column2, ...
FROM original_table
WHERE condition;
Example Of CTAS
Suppose you have a table named “Orders”. You want to create a new table named “RecentOrders” containing only the orders placed in the last 30 days.
This statement would do the trick:
CREATE TABLE RecentOrders AS
SELECT *
FROM Orders
WHERE OrderDate >= DATEADD(day, -30, CURRENT_DATE());
Note that the new table doesn’t inherit any constraints, such as primary key or unique constraints, from the original table.