In some database systems, you explicitly choose when to partition tables. In Snowflake, table partitioning happens automatically behind the scenes using a concept called micro-partitions.
Although you don’t need an in-depth understanding of micro-partitions, you do need to understand how they allow you to cluster your tables for better performance.
This article quickly explains the underlying concepts and then walks you through how to implement clustering and reclustering of your Snowflake tables.
Table of Contents
What Are Micro-Partitions?
Micro-partitions are the fundamental units of storage in Snowflake. When you load data into a table, Snowflake automatically divides the data into micro-partitions.
A Snowflake micro-partition is basically a file with a proprietary format. The data is compressed and grouped by column.
Each file typically contains between 50 MB and 500 MB of uncompressed data.
As well as being columnar, each micro-partition only contains complete rows of data. That may be confusing, so let’s look at this with a visual.
The left of the picture below has the logical structure of a product table with six rows.
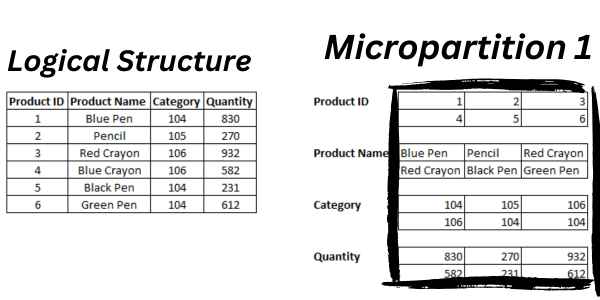
The first micro-partition is on the right. The data is grouped by column, but the partition holds an entire row (six in this example).
What Is Clustering In Snowflake?
Clustering in Snowflake refers to the organization of data in a table. Specifically, it refers to how the data is ordered across the micro-partitions that Snowflake automatically creates.
The simple explanation is that clustering is about sorting data in your table in a way that can speed up queries and improve overall performance.
Although micro-partitions are managed automatically, you can influence how they’re organized by defining a clustering key when creating a table.
What Is Pruning?
Pruning refers to the process of reducing the amount of data that needs to be scanned when executing a query. This is done by skipping over partitions of the data that are not relevant to the query.
When a query is executed, Snowflake uses the metadata of a partition to check if it may contain relevant data.
If the query includes a where clause and the metadata shows that none of the data in that micro-partition can possibly meet the filter condition, then Snowflake can skip over that micro-partition entirely. This process is known as “pruning.”
Pruning is particularly effective when a table has a defined clustering key. This makes it more likely that Snowflake can prune a large number of micro-partitions when the query filter conditions include the clustering key column(s).
How To Define A Cluster Key In Snowflake
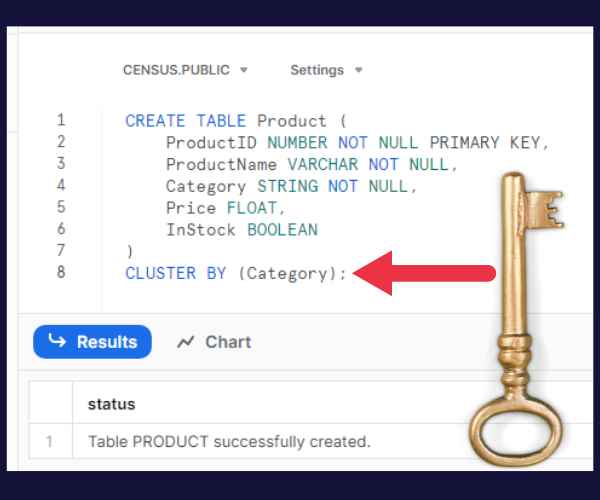
To define a clustering key when creating a table, use the CLUSTER BY clause.
Let’s say that you know that you usually query the product table with a specific category in the WHERE clause. So, you want to cluster by that column.
This statement creates the cluster key:
CREATE TABLE Product (
    ProductID NUMBER NOT NULL PRIMARY KEY,
    ProductName VARCHAR NOT NULL,
    Category STRING NOT NULL,
    Quantity NUMBER
)
CLUSTER BY (Category);
How to remove a cluster key from a table
You use the ALTER TABLE to drop the cluster key from a table.
This example drops the key that we created with the Product table in the previous example.
ALTER TABLE Product DROP CLUSTERING KEYHow to add a cluster key to an existing table
You use the ALTER TABLE command to add a cluster key to a table that already exists.
For example, suppose you want to add a new cluster key to the Product table (because we dropped it). This syntax puts the one we dropped back in place:
ALTER TABLE Product CLUSTER BY (Category);How Cluster Keys Work
Once a clustering key is defined, Snowflake tries to store rows in the same micro-partition or in adjacent micro-partitions where the clustering key values are similar.
When a query is executed, Snowflake is able to reduce the number of micro-partitions that need to be scanned by leveraging the clustering keys. This results in faster query performance.
Note that the initial loading of data into a table with a clustering key does not automatically sort the data fully according to the clustering key.
The benefits of the clustering key become apparent when the data is reclustered. Let’s look at that next.
How To Recluster Tables
Over time, as you load, delete, or update data, the micro-partitions will become less well-ordered with respect to the clustering key. This is known as “clustering skew.”
When the skew becomes too high, the performance starts to degrade.
You can recluster the table to reorder the micro-partitions by using syntax like this:
ALTER TABLE Product RECLUSTER;How To Show Cluster Keys
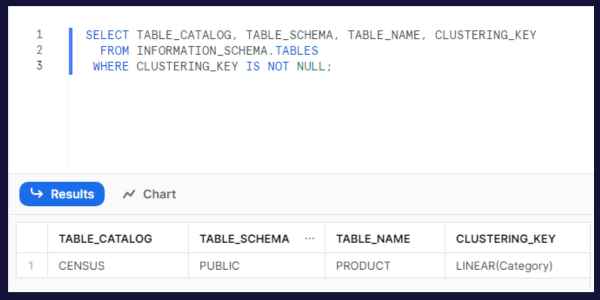
If you want to get a list of tables in your database with cluster keys, you can query the schema metadata through the INFORMATION_SCHEMA.TABLES object.
Here is a sample query:
SELECT TABLE_CATALOG, TABLE_SCHEMA, TABLE_NAME, CLUSTERING_KEY
  FROM INFORMATION_SCHEMA.TABLES
 WHERE CLUSTERING_KEY IS NOT NULL;
This picture shows the query running on the database where I created the Product table earlier.
How To Get Information About Clusters
Snowflake provides a system function to help you understand and manage the clustering of your tables.
It pulls back a number greater than 1 for a populated table. The smaller the average depth, the better it is clustered.
Here is how to call it for our example table:
SELECT SYSTEM$CLUSTERING_DEPTH('Product');Automatic Clustering
Snowflake offers automatic clustering for tables as a premium (and costly) feature.
If you enable automatic clustering, Snowflake periodically and automatically manages the reclustering process for the table in the background.
This keeps the data in the table well-clustered without manual intervention.
Typical Use Case: Partitioning By Date Column
A common scenario is retrieving the most recent data from a growing table with records continuously being added.
A great solution is to create a cluster key on a year or other type of date column. Snowflake will ensure that the data is sequenced by that date column. Your queries by date will be highly optimized.