This article guides you through the process of installing SnowSQL on a Windows machine.
We’ll cover everything from checking system requirements and downloading the installation package, to setting up your SnowSQL configuration file.
By the end of this tutorial, you’ll have a working SnowSQL installation on your Windows computer. Let’s get started!
Table of Contents
A Quick Overview Of SnowSQL
SnowSQL is a command-line tool for interacting with your Snowflake environment. You can use it to execute SQL queries and perform database administration tasks directly from the command line.
It supports scripting, so you can use it for automating tasks and integrating with other systems.
SnowSQL communicates with Snowflake’s servers over a secure, encrypted connection. You may find that the initial connection takes a few seconds.
If you prefer a more graphical interface to the picture below, you can use the Snowflake web browser instead.
Prerequisites for Installing SnowSQL on Windows
Your Windows system must be version 8 or later and you will need administrator access.
SnowSQL doesn’t need a lot of processing power. But it’ll run better if you have 2 GB or more of RAM.
You’ll also need enough disk space for the the application. That’s about 50 MB.
To run SnowSQL, you need a Snowflake account. So, if you don’t have one yet, you can set up a trial account. Make sure you keep a note of the username and password you assign during the set-up.
How To Download SnowSQL For Windows
- Go to the official Snowflake download page.
- Click the “SnowSQL for Windows” link.
- Click the msi installer.
- Run the setup wizard.
- Set the destination folder or keep the default.
- Finish the installation.
Run SnowSQL Once To Create A Configuration File
You open the command prompt on Windows, type “cmd” into the search bar. This opens a small black terminal.
Because the installation wizard sets the path on the Windows system, you don’t need to switch to a specific directory to launch snowsql.
I advise that your run the command prompt in administrator mode. This will avoid setup issues. Follow these steps:
- Enter “cmd” into the search bar.
- Right-click the command prompt.
- Run as Administrator.
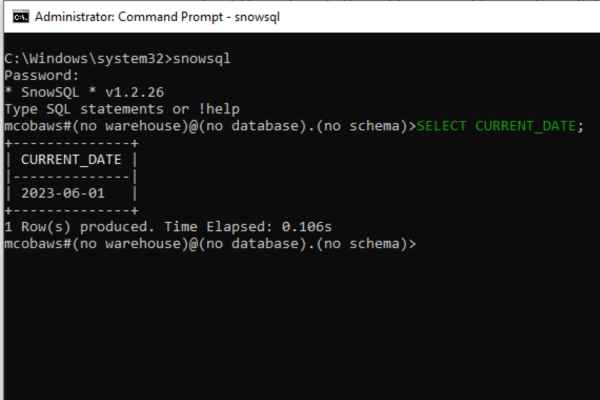
- Enter “snowsql” on the command line.
The first time you run the command, you’ll see an installation bar. The application is creating the configuration folder. When this is finished, you’ll see the help information appear on screen.
The next step is to verify that you can connect to your Snowflake environment. To do this, you need to know your account name, username, and password. If you know these details, skip the next section.
How To Find Your Account Name And User Name
You need to provide three details to connect to Snowflake:
- Account name
- Username
- Password
When I first installed SnowSQL, I wasn’t sure what the difference was between the account name and username. Read on if you’re not sure about your own details.
Finding your account name
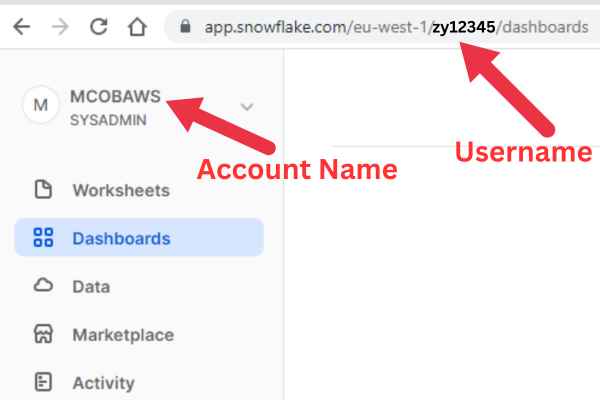
When you sign up for Snowflake, you are provided with an account name which is part of the URL you use to access Snowflake services.
To see it, log into your Snowflake account on the website and look at the URL in the browser. The account name appears after the region.
This picture shows the account name and username in the interface:
Finding your username
When you set up the account, Snowflake creates a username. You can create more afterward, but let’s stick with the default.
Your username is what you log into the Snowflake website with, so you probably know it.
However, you may have set up your browser to log into the website automatically. If you’ve lost track of your username but can log in, it’s displayed in the top left corner of the Snowflake website interface.
Connect SnowSQL By Providing Your Login Details
You can connect with SnowSQL by providing your login details as parameters every time. You can optionally set up your configuration file to let you bypass this. However, it’s worth verifying your connection explicitly after you’ve installed the application.
To do so, launch the command prompt and enter this command:
snowsql -a [account name] -u [username]The application will prompt you for your password.
Note that if you are not in the us-west-2 region, you may have to add your region detail like this:
snowsql -a [account name].[region name] -u [username]What to do if the prompt hangs
It may take a few seconds to connect, depending on your network.
If your account and user names are correct but you use the wrong password, you’ll get a proper error message.
However, if you’re looking at a blinking cursor for a minute, then your account or user name details are probably wrong.
You can ctrl-c to get out of the dialog. This shouldn’t close the prompt window.
In my case, I have to add “.eu-west-1” after my account name. Otherwise the prompt hangs – I don’t get an error message.
How to avoid providing your login details every time
If you don’t want to provide the account and user name parameters, you can set up the connection details in the SnowSQL configuration file.
The rest of this article walks you through how to do this.
Where Is The Configuration File On Windows?
The first time you ran snowsql, it created a configuration file in the snowsql folder on Windows. So, you need to find the snowsql folder.
The default is under the %UserProfile% directory. This will be:
C:\Users\[Windows Account Name]\
If you’re still not sure, open a command prompt and print the variable:
echo %USERPROFILE%The SnowSQL folder is named “.snowsql”.
When you open it in windows explorer, you’ll see the config file. Here is mine:

Understanding The SnowSQL Configuration File
The configuration file tells SnowSQL how to connect to your account and which default settings to apply when it launches.
This file can hold multiple connection profiles, meaning you can set up different profiles for connecting to different accounts, databases, or warehouses.
The configuration file for SnowSQL uses the INI file format. This format consists of sections, each containing key-value pairs.
The section names are enclosed in square brackets, like [section name], and each key-value pair is on a new line in the format key = value.
How To Edit Your Configuration File
Open the config file in notepad and you will see the connections section at the top.
Scroll past the warning messages and you will see a whole lot of connection parameters that are commented out.
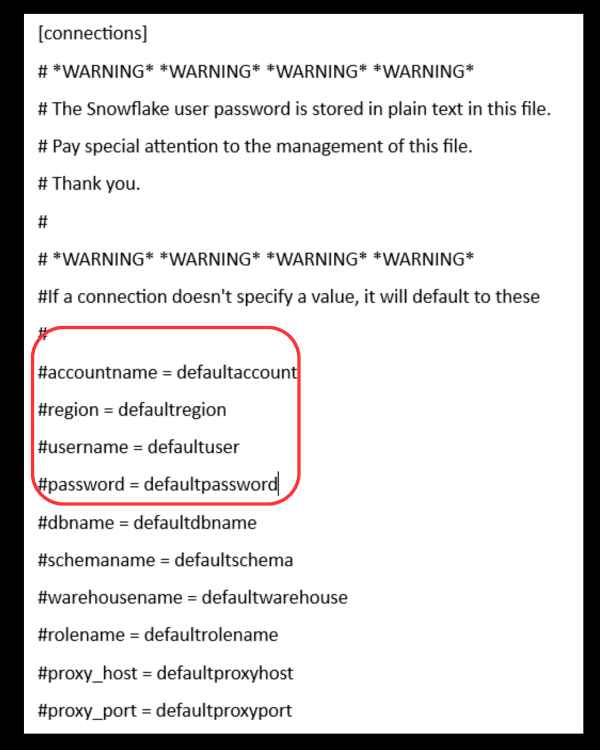
You can remove the comment sign from at least these rows and edit in your own details.
- accountname
- region
- username
Should you add your password?
While it is possible to store your password in the configuration file, it’s generally not recommended for security reasons.
If you don’t specify a password in the config file, SnowSQL will prompt you for it each time you connect.
How To Exit SnowSQL
There are a lot of SnowSQL commands you can pick up, but you may have taken one look at the plain interface and decided you’d rather use the website interface.
So, the only command you need to know is how to get out of the darn thing. Because ctrl-c, often a standard to exit a Windows application, doesn’t work.
To exit the application, type this:
:q!If you’re wondering, it’s like that because the origins of the application are from Linux.