This article shows you how to disable Protected View in Excel 365.
This stops Excel from opening spreadsheets in protected mode. You will no longer see the warning message at the top of the screen.
You should only disable Protected View when you are downloading and working with Excel files that you are certain are safe.
Table of Contents
When Should You Turn Off Protected View?
Do you regularly download Excel files that you know are safe?
I do this when I’m downloading files from my own Microsoft OneDrive or Google Drive.
I know the files are safe because I put them there myself. So, I want to skip the Protect View step when opening these files.
When I’m finished working with this set of files, I will re-enable the protection again.
How Do You Know If Excel Has Opened In Protected View?
If Microsoft Excel has opened a file in Protected View, you will see a yellow warning bar at the top of the page.
You also won’t be able to edit the contents until you click on the “Enable Editing” button.

How To Disable Protected View In Excel Office 365
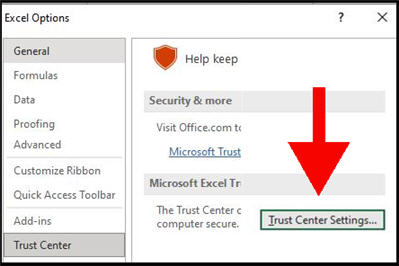
To get to the Protect View settings, you need to go through a few clicks in Excel 365.
- Launch Excel or open any Excel spreadsheet
- Click on “File” and choose the “Options” tab at the bottom of the left pane
- Choose “Trust Center” to the bottom of the left pane of the Options page
- Click on the “Trust Center Settings” button
- Choose “Protected View” on the left pane of the Trust Center page
The Protected View page has three settings that are enabled by default.
I don’t advise that you just disable all three without some thought. You should disable the minimum number of options for your needs.
If you are working with files downloaded from a cloud-based or other online file service, then you only need to disable the first option.
- Enable Protected View for files originating from the Internet
If you are working with files sent via Outlook email, then disable the third option.
- Enable Protected View for Outlook attachments
I advise that you close the Excel application completely after you’ve changed the settings. Otherwise, it doesn’t seem to affect the next file you open.
Potentially unsafe locations
The middle option refers to files located in “potentially unsafe locations”. This can also be used when you’re downloading from a file service.
It should stop protecting files that are in your Internet downloads folder. However, I haven’t found that this works.
I get better results with disabling the first option that deals with files originating from the Internet.
Trusted Locations – An Alternative To Disabling Protected View
The danger with disabling the Protected View options is that you may forget to re-enable them. And later, you mistakenly download a file that contains a virus.
There is a safer option available in the Trust Center. You’ll see “Trusted Locations” near the top of the left pane.
Trusted Locations are file directories that Microsoft considers to be secure.
If you know you’ll be downloading a set of safe files, you can create a new folder on your Windows machine.
Here’s an example where I’ve created a folder named SafeFiles in my Documents folder.
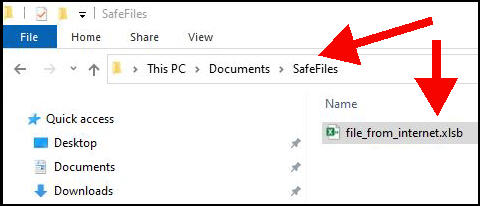
The next step is to tell Microsoft Excel that this is a Trusted Location.
- Choose “Trust Center” on the File->Options page
- Click on the “Trust Center Settings” button
- Choose “Trusted Locations” on the left pane of the Trust Center page
- Click the “Add new location” button
- Browse for your target folder and choose it
- Optional – enable the “Subfolders” option
- Click Ok twice
- Close the Excel application
You can now place files downloaded from the internet into this folder. They will open in Normal mode (not Protected View).
Opening Older Versions Of Microsoft Excel
Are you working with older spreadsheets created in early versions of Microsoft Excel?
By default, files created in Excel 4 and earlier will open in Protected View.
If you want to override this setting, follow these steps:
- Choose “Trust Center” on the File->Options page
- Click on the “Trust Center Settings” button
- Choose “File Block Settings” on the left pane of the Trust Center page
- Turn off the tick box for the file type you’re working with.