If you use the standard way of deleting a WordPress plugin to remove Wordfence, you will not completely remove the security plugin.
That will become clear if you reinstall Wordfence: your configuration options and other data will reappear. This may be what you want. Perhaps you are testing Wordfence behavior with other plugins.
This article walks through the partial removal of Wordfence, and what gets left behind. Then we provide two more ways to remove Wordfence that ensures there is a more thorough clean-up.
Table of Contents
1: Partially Remove Wordfence
If you’re familiar with installing and removing WordPress plugins, then you’ll know about the Deactivate->Delete sequence.
I’ll quickly run through it – but don’t do this until you’ve read the full article. It’s often not the ideal option.
Open the list of installed plugins and you’ll see a “deactivate link” with every application. Deactivating a plugin stops it from working, but doesn’t remove the software and associated data.

Once a plugin is deactivated, you’ll see a new link that allows you to delete it.
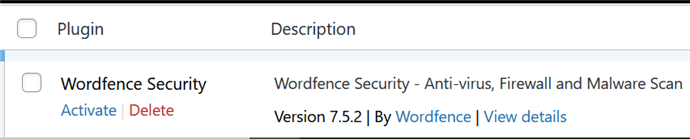
This step removes the software from your website. But that doesn’t mean there are no traces left behind.
Leaving Wordfence data behind
When you remove Wordfence in this manner, the associated data stays behind on your website – even if you can’t see it. The installation created new tables in your WordPress database and inserted data into those tables. This is all left in the database. (Note: other plugins may not behave this way).
The great advantage is that if you choose to re-install the Wordfence plugin, any options that you configured will be reinstated. You won’t have to go through the same steps of making special configurations.
However, many website owners don’t have to make changes to the default options that come with a Wordfence installation. So this may not be a big consideration for you.
When to choose a partial removal
Do you have concerns that Wordfence is causing performance issues? We have an article that gives tips on investigating whether Wordfence is slowing down your website.
The article recommends testing your plugin combinations. This may require repeated removal and installation of Wordfence. This option for partial removal will do fine.
What Gets Left Behind?
With most website hosts, you can happily work away on your WordPress website and never see its underlying database. But every WordPress site has one.
Here’s a view of some of the tables in one of my site’s databases. The first table shown is named “wpfe_users”. This is one of the standard WordPress tables. The next table starts with “wpfe_wf”, as do the next three shown. The “_wf” here shows that this is a Wordfence (wf) table.
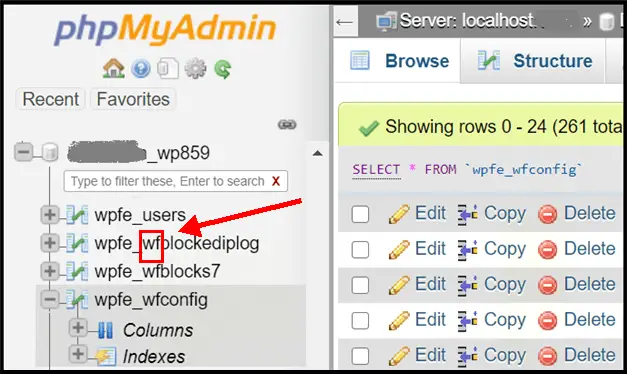
These “wf” tables didn’t exist when your WordPress site was first created. The installation of Wordfence added these tables (and data) into the WordPress database.
So, what happens if you remove the Wordfence plugin by deactivating and deleting it via the Plugin page? These extra Wordfence tables and their data get left behind in the WordPress database.
Some files and folders are also left behind. I’ll discuss this in the final section of this article.
Can you delete these Wordfence tables manually?
If your hosting provider gives you the correct access and tools, then you can remove the tables yourself. However, I don’t recommend this because it’s too easy to do unwanted damage.
The worry is that you’d inadvertently delete one of the vital WordPress system tables. If you do that, you’d likely end up with an unusable website.
At this point, you’d be scrambling for the most recent backup of the database to reverse the damage.
2: Planned Permanent Deletion Of Wordfence
This option ensures that Wordfence tidies up after itself when you deactivate and delete it. I call it “planned” because you need to take specific steps before you proceed with the removal. So, you need to know that you don’t want to preserve the configuration data.
The sequence here is to set a “clean-up” configuration option before you proceed with the removal.
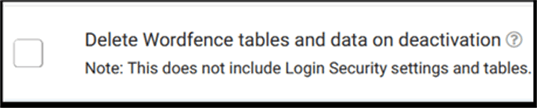
Enable the “clean-up” option
Open the “All Options” page in your plugin’s settings within WordPress.
Expand “General Wordfence Options” and you’ll find the option you need at the end of the list.
Enable “Delete Wordfence tables and data on deactivation”, and be sure to hit the “Save Changes” button.
Now, you’re ready to move on to nix the plugin.
Deactivate and delete the Wordfence plugin
We’ve already described these steps in the early section on partial removal of Wordfence.
This time, you’ve told Wordfence to behave like a proper guest and not leave a mess when walking out the door. When you deactivate and delete the plugin, it will remove the data and extra tables in the WordPress database.
3: Use Wordfence Assistance After You Remove Wordfence
It’s not surprising that people only learn about the option to delete data after they’ve removed the plugin. And by then it’s too late.
Do you need to reinstall the plugin, set the “delete tables and data” option, and go through the deletion process again? Well, you could. But Wordfence has provided another tool that will clean up (i.e. remove) the tables and data.
This tool is a plugin called “Wordfence Assistance”. You’ll find it when you search for Wordfence when adding a new plugin.
You may think it odd that there’s a plugin to complete the deletion of another plugin. (It brings the poem “big fleas have little fleas” to mind). But Wordfence Assistance has a range of functions.
Its primary reason for existence is the rare occasion when a site owner locks themselves out of their own site. Wordfence Assistant to the rescue!
It’s got a few other functions, like a mass deletion of Wordfence live traffic data. You’d use this with a very busy website if you felt that the data was slowing down the website. But let’s take a look at the clean-up side of things.
Wordfence Assistance For Clean Up
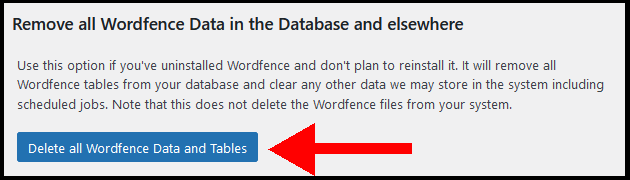
When you have the Wordfence Assistance plugin installed, scroll down the list of utilities it provides.
You’ll find “Delete all Wordfence Data and Tables”. This button will clean up your WordPress database.
Is Wordfence Assistance better for removal?
You may be wondering if using Wordfence Assistance for clean-up is better than ticking the option within the main plugin (as we described in the prior section). Both ways do exactly the same thing: clean up the WordPress database.
The Assistance plugin is much less well known and used. At the time of writing this article, it has 5% of the number of installations as the main Wordfence utility. So, there’s no particular reason to choose it purely for clean-up. And with the philosophy of keeping plugins to a minimum, you’d be wiser to remember the clean-up option within the Wordfence plugin itself.
Wordfence Folders And Files Left Behind
We’ve covered two ways to clean up the data and tables in the WordPress database when removing Wordfence. However, I didn’t mention folders and files on your site.
Personally, these don’t bother me. I don’t like deleting files without absolute necessity, so I don’t take action here.