You can block specific IP addresses with the free version of the Wordfence plugin. The paid version gives you some extra options for handling unwanted traffic.
This article gives you a step-by-step walkthrough on how to block an IP Address with Wordfence. If you know the exact deatils, you can jump to the section on blocking a single IP address.
But Wordfence also helps you review suspicious traffic, and block as you investigate. So we’ll start there.
Table of Contents
Viewing The IP Addresses Of Failed Logins
The Wordfence Firewall dashboard shows you plenty of snapshots of blocking activity. You’ll see aggregated numbers of blocking by country, and the top four IP addresses by how many times they’ve been blocked.
Further down the page, you’ll find the most recent failed logins (you need to toggle the view from “Successful” to “Failed”. Here’s a recent view of mine:
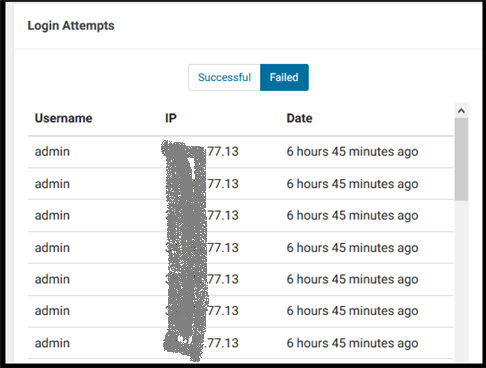
The frequent attempts aren’t the only giveaway of a bad bot. I always remove the “admin” account from my WordPress sites, so nobody should be using that login.
The views on the Firewall page are purely for display purposes. You don’t take action from here.
The Live Traffic view gives you ways to deal with specific IP addresses.
Wordfence Live Traffic View
You access the view of Live Traffic via the “Tools” page.
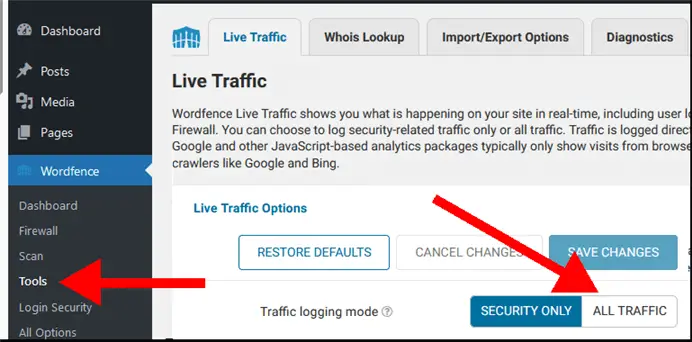
A new installation of Wordfence sets the traffic logging to “Security Only”. This means that only a restricted type of hit on your website are scanned and logged:
- Successful logins
- Unsuccessful login (invalid passwords)
- IP Addresses that are blocked by the premium IP blacklist
You won’t see normal traffic to the rest of your website with this setting. This means that if a bot is hammering your pricing page and slowing response times to potential buyers, you don’t see that activity here.
However, this restricted type of logging is much better for the overall performance of your site. I wrote an article addressing whether Wordfence slows down your website. The default settings of logging used to be “All Traffic” out of the box. When Wordfence switched the default to security, that addressed the performance problems.
However, you can toggle logging over to “All Traffic” temporarily. This lets you observe what’s going on and which pages are being targeted. Once you’ve gathered the info you need, don’t forget to switch back to the less heavy process. To be fair to Wordfence, they’ll pop up a reminder if you leave the setting on “All Traffic”.
Viewing All Traffic With Wordfence
Once you’ve toggled the logging mode, scroll down to watch the traffic.
Here are two recent entries on one of my sites. The first is identified by Wordfence as a Human. The plugin isn’t infallible with this assessment. Plenty of bots try to behave like humans. And I’ve noticed that Wordfence occasionally logs my own activity as that of a bot.
Beneath the human, we see an identified bot. This is where you need to be careful. There are plenty of bots that you will want to welcome to your website with open arms. This example is the Feedly service, which is reading the RSS feed. Sometimes I disable the RSS feed, but I want it in this case.
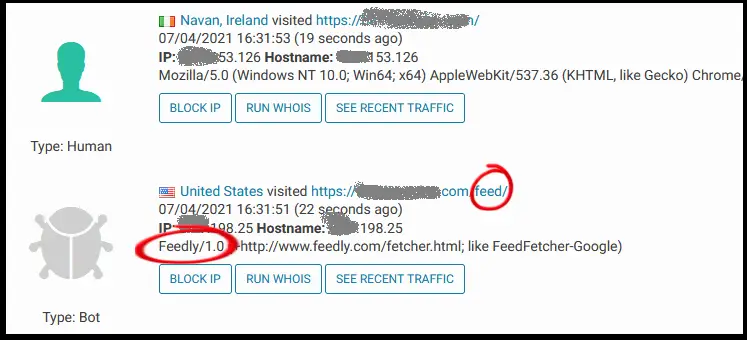
You will also see a nice big blocky button that lets you block the IP address with ease. Clicking the Block IP button takes immediate effect. You’re not asked if you’re sure! You can also undo or unblock immediately, but it’s best to do a little research before you take drastic action.
That research should include checking the WHOIS entry for this I.P. address. Thankfully, Wordfence gives us the option to do so – right beside the Block button.
But before I check the WHOIS information, I usually want to look more closely at the activity of this particular user. So, I use the third button as the next step – that’s the button marked “SEE RECENT TRAFFIC”.
Checking Recent Traffic
It’s important to get some quick context before you block the offending IP addresses.
For example, suppose I was worried about one of the bots I showed earlier. The recent traffic activity shows me that the only area it’s hitting on my website is the /feed/.
That should give me more context to see that this is an RSS reader.
However, suppose I saw activity hammering a PHP script instead of an HTML page. Then I’d get worried. At this point, I’d do some quick research to see if others were reporting this attack.
Using the Wordfence “Run WHOIS” Button
When you click the “Run Whois” button, Wordfence reaches out to the WHOIS Lookup service for the information. You can do this yourself (it’s all free) but Wordfence saves you a few steps.
The Wordfence page can be a little slow to display the information, so you may need to wait a few seconds. If you haven’t looked at WHOIS before, I’ll take you through what you need to glean from it. I clicked on “Run WHOIS” on my own entry in Live Traffic. Here is part of it.
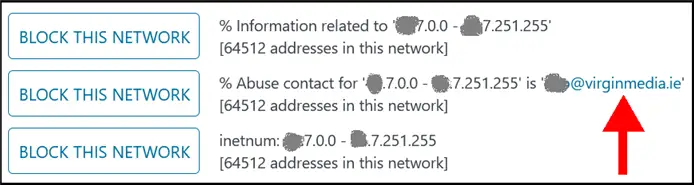
There’s some repeated information, but Wordfence helpfully makes the contact email address a link so it should show up in blue. In my case, the email address is provided by my broadband service provider. This is where they want bot traffic attacks reported.
At some point, you can compose an email to report the problem to the owner of the IP addresses. But if you’re in the middle of a bot attack, you probably have higher priorities. Like blocking the attack and protecting your website immediately.
Wordfence also provides an IP address range. It’s quite a wide range with over 64K addresses.
When I scroll down a little, I see a smaller range mentioned. The Wordfence documentation suggests you restrict the smaller option.
Whichever you choose, you can block the IP range via the “BLOCK THIS NETWORK” button beside it.
Use “Block This Network” To Block An IP Range
Unlike blocking a specific IP address, the “BLOCK THIS NETWORK” block button doesn’t take effect immediately. It takes you to a page to confirm the blocking rule. This lets you edit details like the specific range before you take action.
If you choose to keep the details, you should add a Block Reason. This lets you keep track of your actions. If you’re under pressure with multiple attacks, you’ll be thankful later.
How To Block An IP In Wordfence Directly
We’ve showed how to use the Live Traffic display to jump to blocking IP ranges. But what if you know the IP address and you want to jump straight to kicking it off your website? You don’t need to monitor activity first.
Open the Firewall page and choose the Blocking tab. This is where you can create different types of blocking rules. We’ve already seen the third tab, the “Custom Pattern”. This is where the “BLOCK THIS NETWORK” button landed us, with the details prepopulated.
This time, we’re going to leave it on the default IP Address tab.
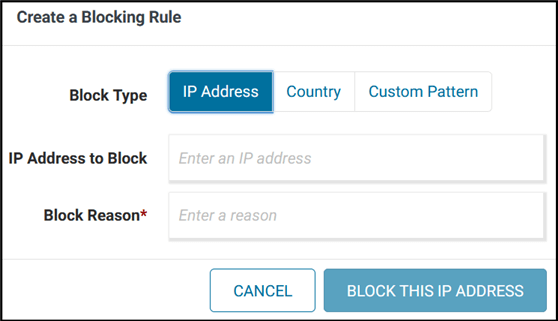
Enter the IP address and a block reason, and drop that ban hammer.
Alternatives To Wordfence – The DIY Approach
You don’t actually need a WordPress plugin to block IP addresses.
WordPress websites have a hidden access file in which you can enter IP addresses to be blocked. This is the .htaccess file.
You should have some web administration experience before you go editing these hidden files. It’s quite possible to bring down your site with a mistaken edit.
How To Block A Country In Wordfence
The premium upgrade allows you to block access at country level. If you’re feeling overwhelmed by successive attacks from the same country, this is a good option even if just as a holding operation.
Once you’ve got the wide block in place, you can continue to review the activity and patterns. This may help you localize the problem to a more specific range of IP addresses.